That I totally forgot to post a picture for Picture Monday! It just totally slipped my mind. That's what happens when the weather gets nice outside I am like a little kid in school ignoring my homework and staring out the window daydreaming.
So, to make it up to you I will be sure to post a really awesome article tomorrow and I will put extra pictures up next week. Please forgive me???

Tuesday, March 31, 2009
Friday, March 27, 2009
Friday Site of the Week
The site of the week this week is not 100% photography related, but it is good info to know.
Head on over to Borders.com and sign up to be on their mailing list. At least once a month they send me either a 30 or 40% off coupon to use in store. Saving money is never a bad thing!
Wednesday, March 25, 2009
Going Pro: Core Values
Two posts in one day! Lucky you... since the last post was more of a comment I wanted to follow up with a post with a bit more "meat" to it.
One of the first things that I think you should do when starting your own business is to define your core values. You can do this before you have a name, before you have even fully decided that you even want to be a business and you should. The sooner the better.
Why is it important to know your core values?
Your core values will influence everything from how you do business to the products that you offer to your company image or "brand". It will allow you to make all kinds of decisions more easily and help you to reinforce your brand in everything that you do. It is important for you to know who you are, and what your company is all about so that you can effectively communicate to the Client what you are all about. If you don't know, how are they going to know and how will you attract the Clients that you are looking for?
Now, you don't have to publish it anywhere or make a big sign. Just sit down and do some thinking about what you think is important. One thing to keep in mind when doing this is that you do need to keep the Client in mind so that you are not pumping tons of time and energy into ultra-cutting edge boudoir photography when you live in a community populated mostly by senior citizens. Not everything you like will be popular in your market, and while I am not saying to sell out or take on an image that is not who you are (please don't) you do need to be cognizant of what your particular market or niche will support.
Next, work your way down to one "Top Priority" and an accompanying list of Core Values.
As an example, my top priority is "Create meaningful, long-lasting client relationships"
My core values that accompany that top priority are:
Relationships
Service
Follow-through
Individuality
Fun
Quality
From that list of values and your top priority you can now create action steps such as:
Always strive to listen attentively and focus solely on the customer during all interactions (In other words no multi-tasking and pay attention)
Return all phone calls and emails within 24 hours.
Develop packages that allow the client to fully customize their experience.
Offer only good quality products that have personality and stand out from the pack.
Knowing my core values helped me decide how to structure my wedding packages, choose my album suppliers, choose which products and services to offer, set my prices, and decide on a theme for my blog.
Once you know your core values you will be amazed at how much easier all of your decisions become. Sit down and give it a few minutes. Good luck!
How do you get there from here?
So, you want to be a professional photographer? You really like photography. You've taken some pictures and people have been impressed. You are starting to think that maybe this is something that you would like to do as a job...
So, how exactly do you get from here (hobbyist or enthusiast) to there (totally rockin pro photographer)? This is a question that I have been thinking about a lot lately since I am in the process of starting my own photography business, so I thought that as part of my blog I will write some educational posts about what I have learned along the way to help out others who may be going through the same things.
Over the next weeks and months I will write notes on some of the following topics (probably not in this order):
What to think about when you think you want to go pro
Research and Planning
Branding and why you need to do it
Defining what makes you special - or why people should pick you
What skills you need to know now
Everyone's favorite - Gear, what you need, what you probably just want
Building your portfolio
Getting yourself out there
Running the Numbers and Making it Legal
Setting your prices (we already touched on this one)
Websites, marketing materials, and samples
Workflow and filing systems
New technologies and web optimization
Choosing Labs and Album Companies
"Me" time and managing stress
Setting and achieving realistic goals
Be a problem solver, not part of the problem
Giving yourself permission
Letting go of wanting to do it all
There will also probably be more things as I run into them, but that is a taste of things to come...
Monday, March 23, 2009

 Two people from Texas met each other in Washington DC and of course they fell in love and got married and are now in the process of living happily ever after. These two were an absolute joy to photograph because they were always completely relaxed (or good at pretending to be) in front of the camera. Lots of great shots came from this shoot, but the reason that this one is my favorite is the way that the top of their heads and the neckline of her shirt make a subtle heart. I love the almost subliminal message of their love for each other.
Friday, March 20, 2009

This weeks site of the week is actually several sites on the same theme. First, you can head over to Victoria Bampton's site and pick up a free pdf download of Lightroom shortcuts:
Lightroom shortcuts link
Then you can surf over to Trevor Morris Photographics for shortcuts for Photoshop:
Photoshop shortcuts link
Lastly, another option is keyboard covers and stickers with photoshop shortcuts printed on them that you can find over at http://www.editorskeys.com/.
Have a good weekend!
Wednesday, March 18, 2009
 So, today I was going to do a quick tutorial on how to make custom "sloppy" frames like the ones that I used for my Monday post. They are really easy and add a little extra something to your images when posting them on online galleries or portfolios. You may notice that my screen looks a little different than yours, but that is because I am still running Photoshop 7 (I know, I know I WILL upgrade any day now, I swear).
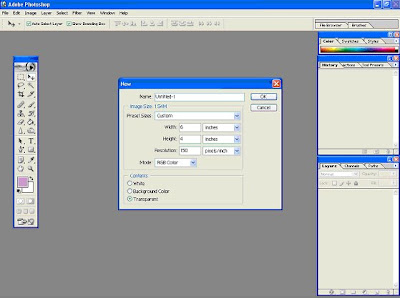
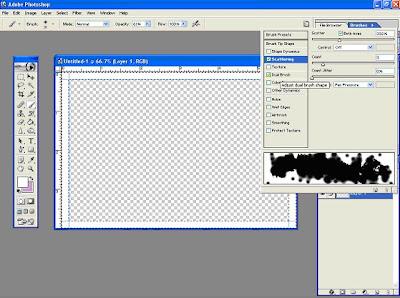
First, open a new document with a transparent background. I choose 4x6 at 150 dpi since I plan on using mine mostly online at low resolution, but you can make yours whatever size and resolution you want.
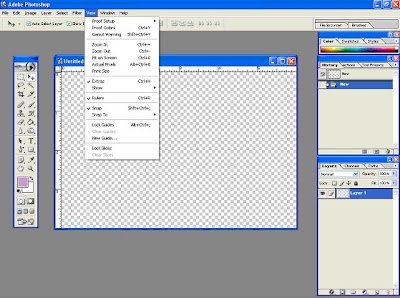
Next, use your guide lines to set up the area for your border. The guides can be found by clicking and dragging from the ruler toolbars, which you can turn on and off through the view tab (as shown below).
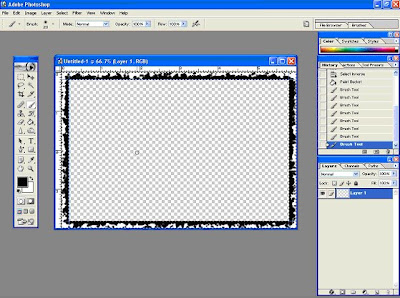
 Now, use your marquis tool (rectangle selection) to select the area in the center of the frame that will contain your picture. Then go to the Select tab and pick inverse. Now everything outside of the "picture" area is active and the center will be protected.
 I chose to fill the background area of the outside section with white using the paint bucket tool. If you do not fill it with a color, you will just have an irregular exterior shape.
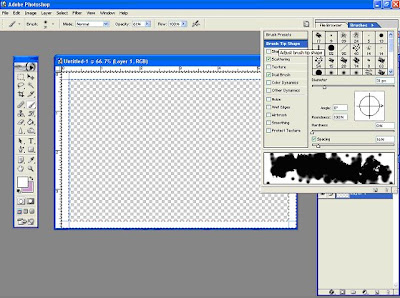
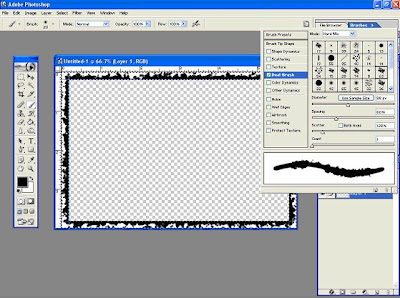
 Next, select your brush type, size and dynamics using the brushes tab. There really is no right or wrong type to use for this so try out some things and see what you like. I included screen grabs of the brush that I used if you are interested.
 Now, just paint around the inner edge of the selected area until you are satisfied (more or less) with the result. Remember, you can move the brush inside the picture area all you want since that area is not selected, it will be protected. This is what I came up with...
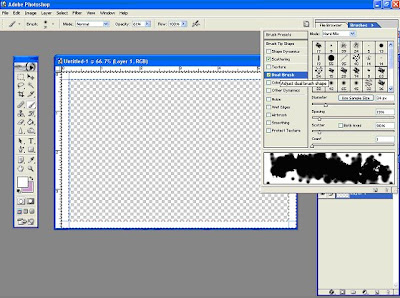
I wanted mine a little thicker so I picked a second brush...
Now, just paint around the inner edge of the selected area until you are satisfied (more or less) with the result. Remember, you can move the brush inside the picture area all you want since that area is not selected, it will be protected. This is what I came up with...I wanted mine a little thicker so I picked a second brush...
 ...and went round again to get something like this:
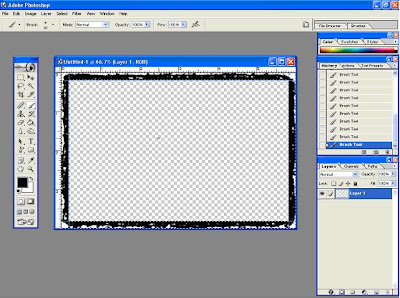 Remember, you can play with different brushes, blending modes, and opacities until you find something that you like. This is fun because there are no rules and no right or wrong answers. So, when you are done just save it as a psd file and you are good to go.
When you go to add it to a picture use the image size dialog to shrink the photo to the size of the interior opening (3.75x5.75 in this case) and then increase the canvas size back to 4x6 so that the border does not cover up any of the objects at the edge of your picture. Enjoy!
Monday, March 16, 2009
 Today's post is dedicated to highlighting an event that I took part in this past Saturday in conjunction with the Junior League of Moore County. The JLMC is a women's volunteer organization open to all ladies 21 and over in Moore County and is part of a larger, national organization American Junior Leagues International (AJLI). Their mission is (paraphrased) to help young women at risk in our community and to help develop the potential of our membership. I have been a member of the JLMC for three years and I currently hold a board position. Their mission is something that I obviously support which is why I am taking the time to feature it here.
This past weekend the JLMC held their 3rd Junior League Academy for Success, which is a program that we conduct twice a year. There are both life skills sessions - how to open a checking account, get into college, select a career, or make smart choices for your future - and life enrichment sessions - make-up and skin care, cooking, drawing, creative writing, yoga.
This session we offered College Knowledge, Career Choices, Smart Choices Strong Futures, Yoga, Glamour Girls, and Creative Expressions. The girls attending were middle school students from the Robbins area of Moore County.
I have attached some pictures from the day and will be posting the complete set on my flickr page in the near future!
+copy.jpg)
In the Creative Expressions session girls learned some marker and pencil drawing techniques and drew self-portraits.
+copy.jpg) A Junior League member with her 3 "buddies". All of the girls were paired with a League member throughout the day.
A Junior League member with her 3 "buddies". All of the girls were paired with a League member throughout the day.+copy.jpg) A League member cheers while the girls at her table examine the contents of the swag bags that they earned for attending.
A League member cheers while the girls at her table examine the contents of the swag bags that they earned for attending.+copy.jpg)
Some of the members of the JLMC after the awards ceremony
+copy.jpg) The League's Community Chair making the rounds and lunch and chatting with the girls
The League's Community Chair making the rounds and lunch and chatting with the girls
+copy.jpg) A League member and some of the participants learning some yoga poses.
A League member and some of the participants learning some yoga poses.
The League's Community Chair making the rounds and lunch and chatting with the girlsA League member and some of the participants learning some yoga poses.Friday, March 13, 2009
 This week's site of the week is the Photoshop Insider Blog by Scott Kelby. Personally, I am not really sure that this guy is human ( or if he is he must never sleep). What doesn't he do? He runs NAPP (National Association of Photoshop Professionals, his blog- which is five days a week with a guest blogger on Wednesday's that is always cool, he is one of the hosts of the Photoshop User podcast, he shoots assignments, and he has written like a hundred books.
I own three of his books right now - The Digital Photography books 1 & 2, and Lightroom 2 for Digital Photographers - and they are all great. His thing is that he writes his books like he is your more experienced buddy sitting with you answering your questions without getting bogged down in the minute details. Technical manuals they are not, but they are easy and fun to read with great information and pictures to accompany the lessons (he even includes photos from the books that you can practice with).
His blog is full of news tidbits and information and you can access it here. Have a great weekend!
Wednesday, March 11, 2009
 As promised this week I am posting a follow up to "The Importance of Organization - Part 1" which covered why it is important to get your photos imported into Lightroom (or the photo editing/organizing program of your choice. I obviously use Lightroom 2 since I am writing about it, but you can do similar things in Photoshop Elements and Google's Picasa both of which are cheap or free) I also issued a little self assignment to myself, and you all as well, to get your photos uploaded and I am happy to say that I have the first 2,000 photos uploaded, which almost brings me current to 2005...slowly but surely.
On to key wording in Lightroom 2. If you want to read about this in more depth I suggest you pick up either The Adobe Photoshop Lightroom 2 Book for Digital Photographers (Voices That Matter) by Scott Kelby or The Adobe Photoshop Lightroom 2 Book: The Complete Guide for Photographers by Martin Evening.
First, you can add keywords manually in the Key wording Panel of the Library Module. If you use this method you can also select groups of photos (either by clicking and holding select to pick a large group of continuous files or by clicking and holding Ctrl to select non-adjacent files) and then type a keyword that will then be applied to all selected photos.
Method two is to use the keyword suggestion dialog box. Lightroom generates keywords it thinks will apply to the group of pictures and you just select and then click to apply.
If you click and hold on the Keyword Set pop-up menu you can choose to load recent keywords, load pre-saved sets of keywords for common themes (outdoors, weddings) or you can make custom keyword sets. Custom sets can be handy because you can put exactly what you want to have in your set and then use them over and over again.
Further down is the keyword list panel where Lightroom lists all of the keywords that you have assigned to photos. If you want to use this list to add keywords to new photos, select the photos that you want to add a specific keyword to, and then simply drag and drop them onto the keyword in the list.
Lastly is the Painter Tool (it looks like a little spray can). You can select it from the bottom tool bar in grid view (press "G" to jump to this view) Once you select the tool a pop-up menu asks what you want to paint with. Choose keywords and a text box appears where you type the keyword that you want to paint with. Then you just scroll through your photos and "paint" on the appropriate ones. If you click the same photo twice it erases the keyword that you just applied. You can paint multiple words at the same time by separating them with a comma in the text field.
As you can probably tell there are a lot of ways to add keywords in Lightroom 2, but none of them work if you don't DO IT. So, what are you waiting for? Get key wording now and make your life tons easier in the future!
Monday, March 9, 2009

 This is a portrait of my good friend Elena that was taken outdoors in 100% available light. It was probably early afternoon when this was taken. One of the things that I try to communicate to clients when they are being photographed is that the more relaxed and fun you are, the more relaxed and fun your photos are.
 Having your picture taken should be fun ( and yes, this is coming from someone who hated having their picture taken as a child because I was hounded by my mother with a camera - and the best of intentions - my entire childhood). Try not to think about the fact that you are having your picture taken and just focus on having a good time!
Friday, March 6, 2009
 This week I am pointing you to a site that I like not just because it offers good technical info (I love the little back-of-the-napkin lighting diagrams) but also because of the personality that goes with it. The site is the blog of photographer Joe McNally and you can find it here.
Not only is this guy a super talented National Geographic cover shooting guy, he tells the greatest personal stories to go along with all of his knowledge. He actually has a new book coming out on March 12th; The Hotshoe Diaries, which I am pretty excited about and plan on picking up. You can pre-order it at Amazon here. That's it for today. Have a great weekend!
Wednesday, March 4, 2009
 I stumbled upon this topic when setting up the blog entry for Monday. It was one of those things that I know is important, and that I have been meaning to do, but that is just really about as fun as getting teeth pulled.
What am I talking about? Setting up and organizing lightroom catalogs and keywording. I really hate it. I started out with good intentions, really I did. I even spent some time thinking about my file structure, naming conventions, etc. Then the problems started. First, I decided that I was going to use one lightroom catalog for all of my professional files (wedding, portraits, etc.) and one for all of my personal files. Sounded like a great idea until I realized that my computer - not exactly state of the art, but not terrible either - gets totally bogged down with large lightroom catalogs.
The next problem starts coming in when I go to look for pictures that were taken before I got my copy of lightroom. One of the greatest things about lightroom is its ability to sort data on command to quickly find whatever you want. But, that is only is you take the time to put in the data in the first place. It can't find files that haven't been imported and keyword searches only work if you have tagged the photos with keywords. Unfortunately they have yet to come up with software that can read my mind and do it for me. *sigh*
So, my big project for the next couple weeks in my copious spare time *hehehe* is to set up all of my lightroom catalogs, import all of my pictures(past, present, and otherwise) and keyword ALL of them. I thought that I would do a multi-part blog article to cover my approach and help you think about yours. Today I will run down how I am setting up my catalogs and next Wednesday I will go over some tips and tricks for keywording.
So, on we go. I have decided that what is best for me (at the moment anyway) Is to work with multiple lightroom catalogs. Each professional portrait session or wedding gets its own catalog. When I name the catalogs I name them with the date (YYMMDD), my two digit category code, the bride's last name then the groom's last name like so:
"090124_WD_bumgarner_tobias"
I do the date this way so that they are always in chronological order when sorted alphabetically by the computer. For portraits it is the same only there is a different category code and just one last name:
"090124_SP_tobias"
For my personal photos I have a catalog for each year just named "Personal 2009". If I find that the catalogs get too large with all the photos from a single year, I will break them down by month "Personal March 2009".
I then also have one more catalog named "Mollie Tobias Photography". In this catalog I put copies of all of my "keepers" any photos from either personal or professional shoots that I really like and plan to use in my portfolio or marketing materials.
That's the plan for now and I will be working on making it happen over the next few weeks. Check back next week for our segment on keywording!
Monday, March 2, 2009
 So, I was feeling a little down the other day. I am not exactly stressed (well I AM but that's not currently the problem) I have just been anxious like crazy. All this energy and no place to go. Well, I made it through another week - yeah! - even getting most of the things on my to-do list tackled - Awesome - but still feeling a bit in a funk. I walked in the door and there to greet me were my cat and two dogs all sitting in a row in front of the door. And they were so excited to see me! One look at their adorable little faces instantly put me in a good mood and so we danced around the room while I chanted "Friday, Friday" and they jumped and barked and wagged their tails. It was great.
 People who do not like dogs I will never understand. They love you unconditionally, they are so darn cute, and they are great cuddlers. I understand that some people may be slightly skeptical when I say how "cute and cuddly" my two 60-90 pounds pit bull mixes are, but it is so true. They are the biggest lovers that you will ever see, even if they do have some issues.
 I have pictures of them hanging by my desk when I am working and sometimes when I am stressed out or bored I just take a minute to look at how adorable - and dirty- they are and it makes me smile. I hope that you get to spend some time today with your thing that makes you smile. Happy Monday!
Subscribe to:
Posts (Atom)