That I totally forgot to post a picture for Picture Monday! It just totally slipped my mind. That's what happens when the weather gets nice outside I am like a little kid in school ignoring my homework and staring out the window daydreaming.
So, to make it up to you I will be sure to post a really awesome article tomorrow and I will put extra pictures up next week. Please forgive me???

Tuesday, March 31, 2009

Friday, March 27, 2009
Friday Site of the Week
The site of the week this week is not 100% photography related, but it is good info to know.
Head on over to Borders.com and sign up to be on their mailing list. At least once a month they send me either a 30 or 40% off coupon to use in store. Saving money is never a bad thing!
Wednesday, March 25, 2009
Going Pro: Core Values
Two posts in one day! Lucky you... since the last post was more of a comment I wanted to follow up with a post with a bit more "meat" to it.
One of the first things that I think you should do when starting your own business is to define your core values. You can do this before you have a name, before you have even fully decided that you even want to be a business and you should. The sooner the better.
Why is it important to know your core values?
Your core values will influence everything from how you do business to the products that you offer to your company image or "brand". It will allow you to make all kinds of decisions more easily and help you to reinforce your brand in everything that you do. It is important for you to know who you are, and what your company is all about so that you can effectively communicate to the Client what you are all about. If you don't know, how are they going to know and how will you attract the Clients that you are looking for?
Now, you don't have to publish it anywhere or make a big sign. Just sit down and do some thinking about what you think is important. One thing to keep in mind when doing this is that you do need to keep the Client in mind so that you are not pumping tons of time and energy into ultra-cutting edge boudoir photography when you live in a community populated mostly by senior citizens. Not everything you like will be popular in your market, and while I am not saying to sell out or take on an image that is not who you are (please don't) you do need to be cognizant of what your particular market or niche will support.
Next, work your way down to one "Top Priority" and an accompanying list of Core Values.
As an example, my top priority is "Create meaningful, long-lasting client relationships"
My core values that accompany that top priority are:
Relationships
Service
Follow-through
Individuality
Fun
Quality
From that list of values and your top priority you can now create action steps such as:
Always strive to listen attentively and focus solely on the customer during all interactions (In other words no multi-tasking and pay attention)
Return all phone calls and emails within 24 hours.
Develop packages that allow the client to fully customize their experience.
Offer only good quality products that have personality and stand out from the pack.
Knowing my core values helped me decide how to structure my wedding packages, choose my album suppliers, choose which products and services to offer, set my prices, and decide on a theme for my blog.
Once you know your core values you will be amazed at how much easier all of your decisions become. Sit down and give it a few minutes. Good luck!
One of the first things that I think you should do when starting your own business is to define your core values. You can do this before you have a name, before you have even fully decided that you even want to be a business and you should. The sooner the better.
Why is it important to know your core values?
Your core values will influence everything from how you do business to the products that you offer to your company image or "brand". It will allow you to make all kinds of decisions more easily and help you to reinforce your brand in everything that you do. It is important for you to know who you are, and what your company is all about so that you can effectively communicate to the Client what you are all about. If you don't know, how are they going to know and how will you attract the Clients that you are looking for?
Now, you don't have to publish it anywhere or make a big sign. Just sit down and do some thinking about what you think is important. One thing to keep in mind when doing this is that you do need to keep the Client in mind so that you are not pumping tons of time and energy into ultra-cutting edge boudoir photography when you live in a community populated mostly by senior citizens. Not everything you like will be popular in your market, and while I am not saying to sell out or take on an image that is not who you are (please don't) you do need to be cognizant of what your particular market or niche will support.
Next, work your way down to one "Top Priority" and an accompanying list of Core Values.
As an example, my top priority is "Create meaningful, long-lasting client relationships"
My core values that accompany that top priority are:
Relationships
Service
Follow-through
Individuality
Fun
Quality
From that list of values and your top priority you can now create action steps such as:
Always strive to listen attentively and focus solely on the customer during all interactions (In other words no multi-tasking and pay attention)
Return all phone calls and emails within 24 hours.
Develop packages that allow the client to fully customize their experience.
Offer only good quality products that have personality and stand out from the pack.
Knowing my core values helped me decide how to structure my wedding packages, choose my album suppliers, choose which products and services to offer, set my prices, and decide on a theme for my blog.
Once you know your core values you will be amazed at how much easier all of your decisions become. Sit down and give it a few minutes. Good luck!
How do you get there from here?
So, you want to be a professional photographer? You really like photography. You've taken some pictures and people have been impressed. You are starting to think that maybe this is something that you would like to do as a job...
So, how exactly do you get from here (hobbyist or enthusiast) to there (totally rockin pro photographer)? This is a question that I have been thinking about a lot lately since I am in the process of starting my own photography business, so I thought that as part of my blog I will write some educational posts about what I have learned along the way to help out others who may be going through the same things.
Over the next weeks and months I will write notes on some of the following topics (probably not in this order):
What to think about when you think you want to go pro
Research and Planning
Branding and why you need to do it
Defining what makes you special - or why people should pick you
What skills you need to know now
Everyone's favorite - Gear, what you need, what you probably just want
Building your portfolio
Getting yourself out there
Running the Numbers and Making it Legal
Setting your prices (we already touched on this one)
Websites, marketing materials, and samples
Workflow and filing systems
New technologies and web optimization
Choosing Labs and Album Companies
"Me" time and managing stress
Setting and achieving realistic goals
Be a problem solver, not part of the problem
Giving yourself permission
Letting go of wanting to do it all
There will also probably be more things as I run into them, but that is a taste of things to come...
So, how exactly do you get from here (hobbyist or enthusiast) to there (totally rockin pro photographer)? This is a question that I have been thinking about a lot lately since I am in the process of starting my own photography business, so I thought that as part of my blog I will write some educational posts about what I have learned along the way to help out others who may be going through the same things.
Over the next weeks and months I will write notes on some of the following topics (probably not in this order):
What to think about when you think you want to go pro
Research and Planning
Branding and why you need to do it
Defining what makes you special - or why people should pick you
What skills you need to know now
Everyone's favorite - Gear, what you need, what you probably just want
Building your portfolio
Getting yourself out there
Running the Numbers and Making it Legal
Setting your prices (we already touched on this one)
Websites, marketing materials, and samples
Workflow and filing systems
New technologies and web optimization
Choosing Labs and Album Companies
"Me" time and managing stress
Setting and achieving realistic goals
Be a problem solver, not part of the problem
Giving yourself permission
Letting go of wanting to do it all
There will also probably be more things as I run into them, but that is a taste of things to come...
Monday, March 23, 2009

 Two people from Texas met each other in Washington DC and of course they fell in love and got married and are now in the process of living happily ever after. These two were an absolute joy to photograph because they were always completely relaxed (or good at pretending to be) in front of the camera. Lots of great shots came from this shoot, but the reason that this one is my favorite is the way that the top of their heads and the neckline of her shirt make a subtle heart. I love the almost subliminal message of their love for each other.
Friday, March 20, 2009

This weeks site of the week is actually several sites on the same theme. First, you can head over to Victoria Bampton's site and pick up a free pdf download of Lightroom shortcuts:
Lightroom shortcuts link
Then you can surf over to Trevor Morris Photographics for shortcuts for Photoshop:
Photoshop shortcuts link
Lastly, another option is keyboard covers and stickers with photoshop shortcuts printed on them that you can find over at http://www.editorskeys.com/.
Have a good weekend!
Lightroom shortcuts link
Then you can surf over to Trevor Morris Photographics for shortcuts for Photoshop:
Photoshop shortcuts link
Lastly, another option is keyboard covers and stickers with photoshop shortcuts printed on them that you can find over at http://www.editorskeys.com/.
Have a good weekend!
Wednesday, March 18, 2009
 So, today I was going to do a quick tutorial on how to make custom "sloppy" frames like the ones that I used for my Monday post. They are really easy and add a little extra something to your images when posting them on online galleries or portfolios. You may notice that my screen looks a little different than yours, but that is because I am still running Photoshop 7 (I know, I know I WILL upgrade any day now, I swear).
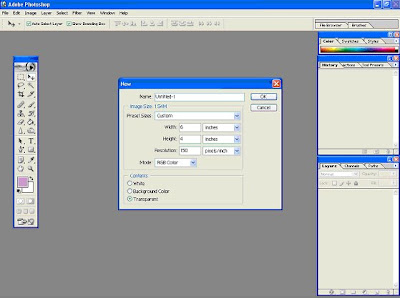
First, open a new document with a transparent background. I choose 4x6 at 150 dpi since I plan on using mine mostly online at low resolution, but you can make yours whatever size and resolution you want.
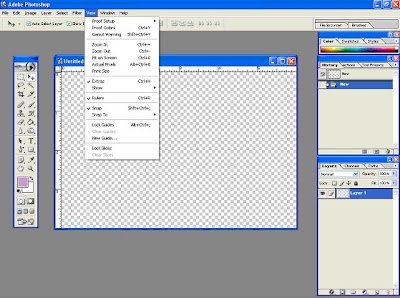
Next, use your guide lines to set up the area for your border. The guides can be found by clicking and dragging from the ruler toolbars, which you can turn on and off through the view tab (as shown below).
 Now, use your marquis tool (rectangle selection) to select the area in the center of the frame that will contain your picture. Then go to the Select tab and pick inverse. Now everything outside of the "picture" area is active and the center will be protected.
 I chose to fill the background area of the outside section with white using the paint bucket tool. If you do not fill it with a color, you will just have an irregular exterior shape.
 Next, select your brush type, size and dynamics using the brushes tab. There really is no right or wrong type to use for this so try out some things and see what you like. I included screen grabs of the brush that I used if you are interested.
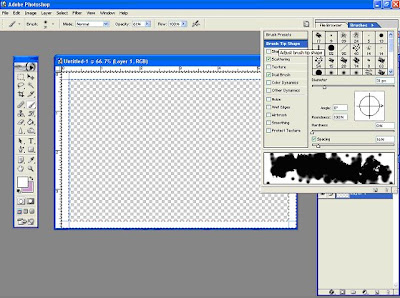
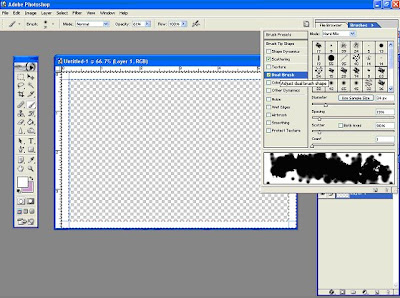
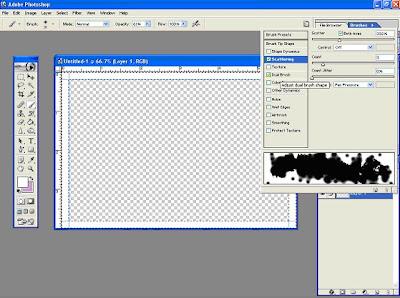 Now, just paint around the inner edge of the selected area until you are satisfied (more or less) with the result. Remember, you can move the brush inside the picture area all you want since that area is not selected, it will be protected. This is what I came up with...
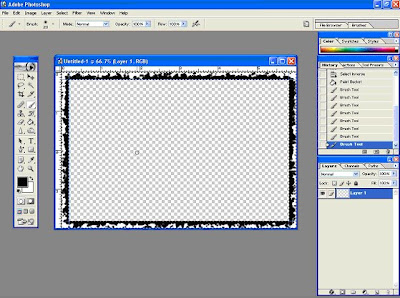
I wanted mine a little thicker so I picked a second brush...
Now, just paint around the inner edge of the selected area until you are satisfied (more or less) with the result. Remember, you can move the brush inside the picture area all you want since that area is not selected, it will be protected. This is what I came up with...I wanted mine a little thicker so I picked a second brush...
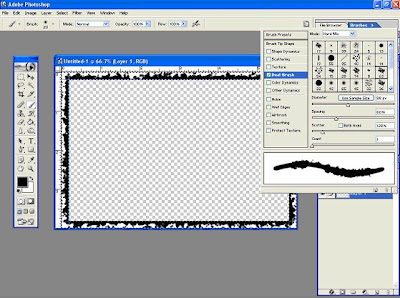 ...and went round again to get something like this:
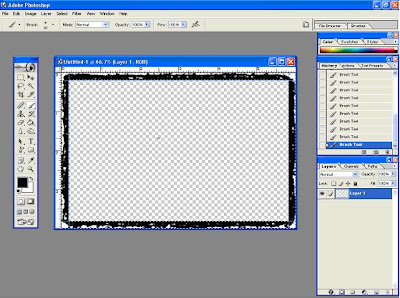 Remember, you can play with different brushes, blending modes, and opacities until you find something that you like. This is fun because there are no rules and no right or wrong answers. So, when you are done just save it as a psd file and you are good to go.
When you go to add it to a picture use the image size dialog to shrink the photo to the size of the interior opening (3.75x5.75 in this case) and then increase the canvas size back to 4x6 so that the border does not cover up any of the objects at the edge of your picture. Enjoy!
Subscribe to:
Posts (Atom)