


Your wedding is supposed to be a big deal. You only get married once (hopefully!) to the love of your life and these are memories that you want to cherish for a lifetime. You look your best, you've probably had your hair, make-up, and nails professionally done. Everyone is in nice clothes and in a great mood ready to share your big day.
There are a lot of people out there today (especially with digital cameras being better and better quality for lower and lower prices) who are going out and taking pictures and then burning them onto a disk and handing them over to the client for a few hundred bucks (shoot-n-burners). In ecomomic times like these this can seem like a great idea. If you are a do-it-yourselfer and you know photoshop, maybe it's a good way for you to stretch your budget.
I have been known to be cheap (ask my husband if you have a few hours to spare hearing about it) And every time I have given in to the urge to buy the cheap one instead of the one I really wanted, I have regretted it. Usually all that this means is that I end up buying two instead of one and ultimately spending more money (not a good move). Here's the thing. This isn't a toaster. It's the physical evidence of one of the most important days of your life and if you go cheap and don't get the results that you want, there's no do over.
I put together a quick little tutorial to show an easy retouching method that I like to use for circles and deep wrinkles. This is the type of basic retouching that I do in all my portraits, not as an extra, but as a given. I don't want my client to see anything in which they are not looking their best. Not every photo gets this level of attention (though all photos go through basic adjustments for color balance and exposure, etc.) But any of the important portraits and client favorites do.
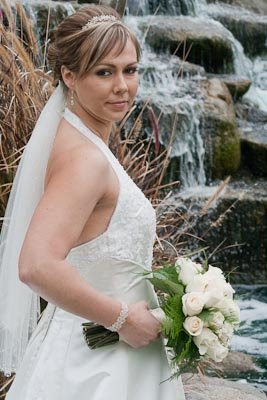.jpg) Here is the picture out of the camera after being imported into lightroom. It's a great portrait of a beautiful bride but what strikes me first is a little uneveness in her skin at the cheeks and a little bit of extra color under her eyes (she did just spend a year planning a wedding for crying out loud...) There are a lot of methods for retouching, a lot of which include using a blur filter to soften imperfections. While that application is good for some things, you tend to loose the texture of the skin which can make the person look overly airbrushed and fake.
Here is the picture out of the camera after being imported into lightroom. It's a great portrait of a beautiful bride but what strikes me first is a little uneveness in her skin at the cheeks and a little bit of extra color under her eyes (she did just spend a year planning a wedding for crying out loud...) There are a lot of methods for retouching, a lot of which include using a blur filter to soften imperfections. While that application is good for some things, you tend to loose the texture of the skin which can make the person look overly airbrushed and fake..jpg) I started out here by adding a new blank layer (you can do this in the layer panel or by pressing ctrl+shift+N for PC or command+shift+N for Mac - I am a PC user so if I screw up the Mac lingo feel free to correct me). On the new blank layer I use the eyedropper tool to select a color that is adjacent to, but slightly lighter than the area that I wish to camoflage. I then select the brush tool and pick a small round brush with the softness set to 100% and lower to opacity to somewhere between 30 - 50% (you can always lower the layer opacity later as well, but I like to get it as close as possible first). Now with those brush settings I use small brush strokes to layer color over the dark or uneven areas until I am happy with the results. I try to limit the area that I am brushing over to retain as much texture as possible. This step is all about the blending...the result is what you see above.
I started out here by adding a new blank layer (you can do this in the layer panel or by pressing ctrl+shift+N for PC or command+shift+N for Mac - I am a PC user so if I screw up the Mac lingo feel free to correct me). On the new blank layer I use the eyedropper tool to select a color that is adjacent to, but slightly lighter than the area that I wish to camoflage. I then select the brush tool and pick a small round brush with the softness set to 100% and lower to opacity to somewhere between 30 - 50% (you can always lower the layer opacity later as well, but I like to get it as close as possible first). Now with those brush settings I use small brush strokes to layer color over the dark or uneven areas until I am happy with the results. I try to limit the area that I am brushing over to retain as much texture as possible. This step is all about the blending...the result is what you see above.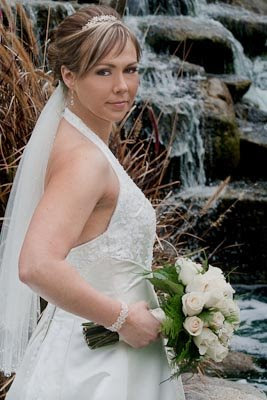.jpg) After I had evened out the skin tone and lightened the dark circles there were a few wrinkles on her neck from how she was posed that were really grabbing my attention. To deal with these I make another new layer and follow the same procedure as before, sampling near the area with a lighter color and then "filing in" the lines. I try to keep my brush as small as possible and only go over the darkest parts of the lines to keep the end result looking natural. After the initial filing is done I like to pick a slightly darker adjacent color and then drop my brush opacity to around 15%. I then increase my brush size quite a bit and swipe it over the whole area to blend it all together a bit. That's it! The picture above is the end result. It still looks like her only a little more glamorous.
After I had evened out the skin tone and lightened the dark circles there were a few wrinkles on her neck from how she was posed that were really grabbing my attention. To deal with these I make another new layer and follow the same procedure as before, sampling near the area with a lighter color and then "filing in" the lines. I try to keep my brush as small as possible and only go over the darkest parts of the lines to keep the end result looking natural. After the initial filing is done I like to pick a slightly darker adjacent color and then drop my brush opacity to around 15%. I then increase my brush size quite a bit and swipe it over the whole area to blend it all together a bit. That's it! The picture above is the end result. It still looks like her only a little more glamorous.
No comments:
Post a Comment