
Today I am going to show you an easy way to make a watermark from your logo or text that you can use to stamp photos that you plan to give to consultants, use on your website, or give to clients as proofs.
First, I do not think that there is anything wrong with watermarking prints that you are giving to consultants or vendors. They get great pictures of their product and you get a little bit of free advertising. It's a win - win.
You could automate this whole process with an action, but I prefer to crop and place watermarks on each image individually to ensure that I am happy with the end result.
To get started you can either use your logo or you can make a watermark from text if you do not have a logo. You will need to have either on a pure white background for this to work. My logo (luckily) already has a white background as you can see below.
 First thing that I did is convert my image to grayscale. Brushes only work with black, white, and shades of grey so working in monochrome is key to staying within the usable shades. The way that the colors work once you define the brush is that white is subtracted from the image, black is 100% opaque, and grey takes on less opacity the less black is in the color (90% grey would be 90% opacity, 40% grey is 40% opacity, etc.) just like if you had a black logo on a layer and you lowered the opacity. You can use this knowledge to create some cool effects with different levels of opacity in your logo. I like my entire logo to be semi-opaque so you will notice that nothing in my logo is pure black (see below)
 Once you have your logo how you like it, flatten the image and then go to Edit -> Define Brush.
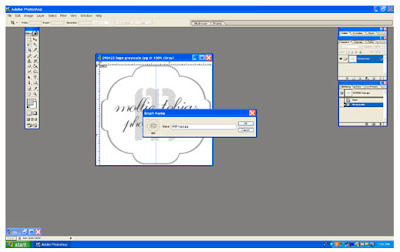
A window will pop up asking you to name your brush. I named mine MTP logo. If your image is too large you will not be able to select define brush from the edit menu. Resize your image to be smaller and try again.
 After you have named your brush and clicked okay select the brush tool from the palette or type "B" to select the brush tool. To locate the brush that you just created navigate to the brushes toolbar at the top of your screen or go to Window -> Brushes. You should see your newly defined brush listed if you click on "brush tip shape" in the brushes drop down. Select your brush and then adjust the size to fit the image that you are planning to watermark.
 Type "D" to return the color swatches to the default black and white. I always use either black or white when watermarking but you can experiment and see what you like best. To toggle between your drawing and erasing swatches you can type "X". Below is an example of my logo brush in white.
.jpg) If you do not have a logo you can accomplish the same thing with text. Make a new document (I made mine 5" x 1" @ 300 dpi) and type the text that you want to appear as your watermark in either black or a shade of grey. If you want to use a copywrite symbol I have found that the easiest way to get one into photoshop is to open a Word document and insert it as a symbol and then copy and paste it into a text block in photoshop. Then you follow the same steps to define and name your brush as outlined above. The result can be seen below:
If you do not have a logo you can accomplish the same thing with text. Make a new document (I made mine 5" x 1" @ 300 dpi) and type the text that you want to appear as your watermark in either black or a shade of grey. If you want to use a copywrite symbol I have found that the easiest way to get one into photoshop is to open a Word document and insert it as a symbol and then copy and paste it into a text block in photoshop. Then you follow the same steps to define and name your brush as outlined above. The result can be seen below:
.jpg) I hope that you all found this info helpful. Be sure to leave your thoughts about watermarking in the comments and if you like what you see be sure to follow the blog. Happy Wednesday!
I hope that you all found this info helpful. Be sure to leave your thoughts about watermarking in the comments and if you like what you see be sure to follow the blog. Happy Wednesday!
After you have named your brush and clicked okay select the brush tool from the palette or type "B" to select the brush tool. To locate the brush that you just created navigate to the brushes toolbar at the top of your screen or go to Window -> Brushes. You should see your newly defined brush listed if you click on "brush tip shape" in the brushes drop down. Select your brush and then adjust the size to fit the image that you are planning to watermark. Type "D" to return the color swatches to the default black and white. I always use either black or white when watermarking but you can experiment and see what you like best. To toggle between your drawing and erasing swatches you can type "X". Below is an example of my logo brush in white.
.jpg) If you do not have a logo you can accomplish the same thing with text. Make a new document (I made mine 5" x 1" @ 300 dpi) and type the text that you want to appear as your watermark in either black or a shade of grey. If you want to use a copywrite symbol I have found that the easiest way to get one into photoshop is to open a Word document and insert it as a symbol and then copy and paste it into a text block in photoshop. Then you follow the same steps to define and name your brush as outlined above. The result can be seen below:
If you do not have a logo you can accomplish the same thing with text. Make a new document (I made mine 5" x 1" @ 300 dpi) and type the text that you want to appear as your watermark in either black or a shade of grey. If you want to use a copywrite symbol I have found that the easiest way to get one into photoshop is to open a Word document and insert it as a symbol and then copy and paste it into a text block in photoshop. Then you follow the same steps to define and name your brush as outlined above. The result can be seen below:.jpg) I hope that you all found this info helpful. Be sure to leave your thoughts about watermarking in the comments and if you like what you see be sure to follow the blog. Happy Wednesday!
I hope that you all found this info helpful. Be sure to leave your thoughts about watermarking in the comments and if you like what you see be sure to follow the blog. Happy Wednesday!
2 comments:
Thank you thank you thank you!!!
Very helpful and easy to understand!
Thank you so much it has been a good help, now to make a watermark from our logo is definitely very easy with your guidance. Kudos
Post a Comment