Search Engine Optimization (SEO)...what is it all about? I am for sure not the expert on this topic but it is something that I have been looking into since it took about a week for my website to show up on Google.
You mean it won't just appear because I put it on the Internet? Maybe, maybe not. But, SEO can help. So for today's tutorial I am sending you off to someone who does know something about it http://www.problogger.net/search-engine-optimization-tips-for-bloggers/
Hope you find it informative. I did. Happy Wednesday!

Wednesday, July 15, 2009
Monday, July 13, 2009
Picture Monday - Elena
Elena always has a smile on her face, and what a pretty smile it is. She is one of those people who is always ready to help someone else and always has an incredibly positive attitude. I really enjoyed getting to shoot her in lovely Savannah, Georgia which is one of my favorite southern cities. I still try to get back as often as I can to visit and when I get to mix business with pleasure it's even better! Hope you enjoy the images and be sure you are reading the worldwide photowalk blog all this week for tips and info on the photowalk which is coming up this Saturday! If you haven't signed up yet there is still time so go on to http://www.worldwidephotowalk.com/ to sign up for the Sandhills Area walk. Have a great Monday!


Thursday, July 9, 2009
Friday Site(s) of the Week!
Hey everyone! As promised I am compiling a list of links to all things photowalk related.
First, be sure to go to the main photowalk to look at the prizes, gear guide, and FAQ. Then, be sure to download your free trial of lightroom if you don't have it already. Also there is probably still time if you would like to purchase an official photowalk t-shirt to benefit Springs of Hope orphanage in Kenya (got mine already)
http://worldwidephotowalk.com/
Next, scroll to the bottom of the page and read the archives for the worldwide photo walk blog. It has links to all sorts of great resources including that blog post I linked to in my Monday post.
Next week there will be a post everyday leading up to the big walk next Saturday so be sure to read up.
Next up, Jeff Revell at PhotowalkPro, the link is for a guide to photowalking, but his whole blog is dedicated to it.
http://www.revellphotography.com/blog/?p=474
This last one is actually on the wwpw blog site but I gave it it's own link anyway:
http://worldwidephotowalk.com/blog/2009/06/05/its-guest-blog-friday-featuring-laurie-excell/
If anyone has any last minute questions be sure to let me know. I will be at the Sandhills Photography Club meeting on Monday night to talk a bit about it as well. That's it for me. Have a great weekend!
Wednesday, July 8, 2009
Quick Layout Technique
So, today I'm going to show you how to do a quick layout for a 9x9 collage with an art print border.
1. Create a new document that is 11x14 with a white background.
2. Layout your grid lines. for this size canvas you can have three 3" x 3" squares with 1/2" all around. Set your guides both horizontally and vertically at 1/2", 3 1/2", 4", 7", 7 1/2", and 10 1/2".
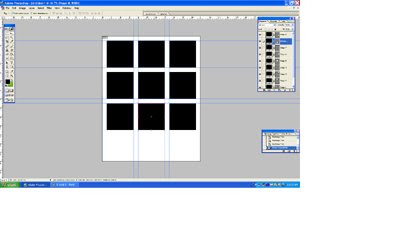
3. Select your shape tool and go to town. This template can be pretty versatile and I am showing it in the next few steps with several shape options. You can do rectangles...
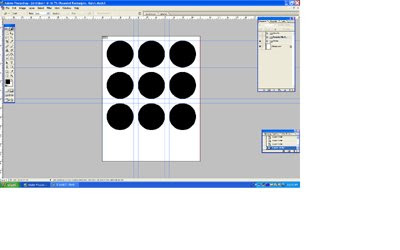
Circles...
or rounded rectangles...you may want to set up all three shapes and use this as a master template file like I have done here.
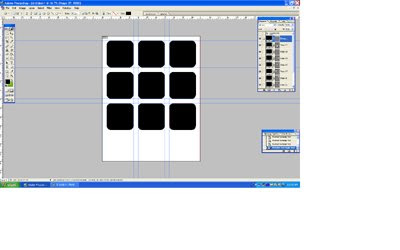 (A word on setting to help you out with making and placing the shape layers: Be sure that under the shape menu you have selected the square with points at each corner - to make a shape rather than a path or fill pixels. There is a little pull down arrow on the top tool bar after all of the shape icons, if you open that menu you can choose from having your shape be unconstrained, square, fixed size, or proportional. Choose fixed size and type in 3x3. Now you can just click at the corner of your grid and the right size shape magically appears)
1. Create a new document that is 11x14 with a white background.
2. Layout your grid lines. for this size canvas you can have three 3" x 3" squares with 1/2" all around. Set your guides both horizontally and vertically at 1/2", 3 1/2", 4", 7", 7 1/2", and 10 1/2".
3. Select your shape tool and go to town. This template can be pretty versatile and I am showing it in the next few steps with several shape options. You can do rectangles...

Circles...
or rounded rectangles...you may want to set up all three shapes and use this as a master template file like I have done here.
 (A word on setting to help you out with making and placing the shape layers: Be sure that under the shape menu you have selected the square with points at each corner - to make a shape rather than a path or fill pixels. There is a little pull down arrow on the top tool bar after all of the shape icons, if you open that menu you can choose from having your shape be unconstrained, square, fixed size, or proportional. Choose fixed size and type in 3x3. Now you can just click at the corner of your grid and the right size shape magically appears)
4. Add your logo or title at the bottom of the page.
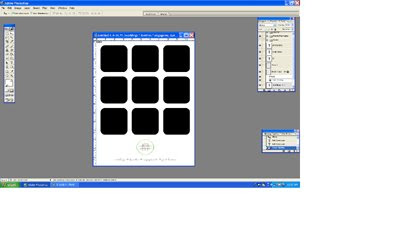 5. Add your pictures. Bring in your photos and arrange each photo in the layers panel to be above the shape layer in the desired position. Once the layers are all in order, click on the photo you are working with and type crtl+alt+g to clip the layer to the shape. This will only let the portions of the photo within the shape layer show and mask the rest. Doing this saves you a lot of erasing and makes it easier to make adjustments if you change your mind later. You can still use the bounding box to scale and / or move the photo around. Repeat that process 8 more times and you should come out with something like this:
 Have a happy Wednesday!
 Monday, July 6, 2009
Picture Monday and then some...
Hello everyone! I hope that you all had a great holiday weekend. I sure did try to but somehow I ended up working a lot more that I should have. I did however get to eat some hamburgers and make a stop at First Friday in Southern Pines.
If you saw the Pilot on Friday, you may have seen the full page spread of my photos from Pinestock and the article on the photowalk. I am posting some of the Pinestock photos that didn't make the paper below as part of Picture Monday, but first some photowalk updates:
We have 20 people registered and I have gotten a great response from the article in the Pilot. Keep it up everyone!
Next, here is a link to a short video showing you some things to be sure that you do before the photowalk:
http://layerstvrc.blip.tv/file/2313619/
I will also be listing some more links for the photowalk this Friday for the Friday sites of the week that will cover some FAQs, what a photowalk is all about, gear suggestions, and tips so stay tuned for that and be sure to check back on Friday.
As a side note: since my official website launched you can now access the blog by going to http://www.mollietobiasphotography.com/ and clicking on the "blog" image on the splash screen.
Okay, on to the images!

 Kim Kirkpatrick, face painter extraordinaire was one of the many great vendors at the concert.
 Bailey and Devon were on hand spreading the word about Mira, a seeing eye dog foundation.


 Volunteers did all of the painting for the signs and the stage, which looked great!
 The concert was organized to benefit the boys and girls club.


 This one was actually my favorite from the day. I love the way the colors swirl around in the background and the reflection in his glasses.
If you saw the Pilot on Friday, you may have seen the full page spread of my photos from Pinestock and the article on the photowalk. I am posting some of the Pinestock photos that didn't make the paper below as part of Picture Monday, but first some photowalk updates:
We have 20 people registered and I have gotten a great response from the article in the Pilot. Keep it up everyone!
Next, here is a link to a short video showing you some things to be sure that you do before the photowalk:
http://layerstvrc.blip.tv/file/2313619/
I will also be listing some more links for the photowalk this Friday for the Friday sites of the week that will cover some FAQs, what a photowalk is all about, gear suggestions, and tips so stay tuned for that and be sure to check back on Friday.
As a side note: since my official website launched you can now access the blog by going to http://www.mollietobiasphotography.com/ and clicking on the "blog" image on the splash screen.
Okay, on to the images!

 Kim Kirkpatrick, face painter extraordinaire was one of the many great vendors at the concert.
 Bailey and Devon were on hand spreading the word about Mira, a seeing eye dog foundation.
 Volunteers did all of the painting for the signs and the stage, which looked great!The concert was organized to benefit the boys and girls club.
 This one was actually my favorite from the day. I love the way the colors swirl around in the background and the reflection in his glasses.
Have a great week everyone and be sure to check back Wednesday for some tutorial fun.
Friday, July 3, 2009
Friday Site of the Week!
So, if you follow me on Twitter (MollieTobias) or you read the comments on the blogs you probably already know what today's site of the week is.
www.mollietobiasphotography.com!
I will probably be tweaking it a bit over the next few weeks, but it is up and running so go check it out!
Some other news, if you live in the Southern Pines/Pinehurst/Aberdeen area go pick up a copy of the Pilot today. I am featured in it twice! I know, cool. One article is about the upcoming photowalk and then there is a full page spread of the photos that I took for Pinestock last weekend.
Hope you all have a safe and happy 4th of July weekend!
Wednesday, July 1, 2009
Joe McNally Workshop Review
If you follow my Twitter (@MollieTobias) you will know that I was debating on whether to blog about the McNally workshop or how to shoot fireworks today. Well, since I really love you guys I decided to do both.
Here is the link to a really good article at DPS on shooting fireworks. It says pretty much everything that I would have said. I was a little unmotivated about the whole 4th of July thing this year since all of my friends are busy and it looks like I will be spending it solo (I know, my coolness oozes) but the article got me a little bit excited. Last year I did a lot of close up shots of the fireworks so this year I am going to try to scope out the area early and get more of a landscape feel with some context. Let you know how it goes.
On to the workshop!
We started out the day watching a brief (very) slideshow of Joe's work and introducing ourselves to the group. We them went right into observing Joe set up a small flash set up with Andrew (one of Joe's tech helpers) as the model. I don't have any pictures of that set up because at that point I was still being a little shy with the picture taking but you can see it at Joe's blog under the post "They're Back" (it's the first image).

Next, we moved on to working with the models. One of the things that was nice about working with models that I don't get a lot of normally is that an experienced model, like Jasmine (above) knows what poses make her look good so you don't have to do a lot of work in that regard. It is fun to have the pressure of posing taken off of you and if you are shooting some images purely for portfolio I recommend getting a professional model - as opposed to your bosses daughter - for exactly that reason. It lets you really focus on the set up and the timing it takes to get a good picture with the right expression, eyes open, etc.

One of the first things that I really noticed about the lighting set-ups was how close the light modifiers were to the models. In a shot like the one above of Nathalia there would be a gold reflector at bust level and a diffuser panel overhead literally centimeters out of frame for a close shot like this. Why? Because the closer your modifier is to the subject the more spread you get from the light coming through it which makes the light softer and gives it more wrap.


I know in theory that reflectors are a great tool, especially for fill, but I almost never use them because of the hassle of getting them positioned when working by yourself. Then I discovered the magic technique of throwing it down on the ground and bouncing a flash off of it to create fill. How much difference does it really make? Depends on the lighting situation, but in some cases pretty big. Here's the thing to remember - you are not trying to bounce the flash off of the reflector and angle it towards your subject. Just point it straight down at the reflector a few inches above it and go to town.

This shot is a very high key shot that you might think required a lot of flash power. It was actually shot available light only at a super high ISO 6400. I dialed up my exposure compensation to overexpose between one and two stops and the high ISO gave me a fast enough shutter speed to handhold and still get results like this. If you were to really blow it up there is a bit of noise in her skin tones but really pretty tolerable because of the high key nature of the image.

The whole workshop was set in studio type settings while I was there (though they did branch out and do some other stuff on subsequent days which really makes you want to be there everyday) but I still wanted to get some lifestyle type images. Lauren (above) is not a professional model, but she did a fabulous job. I will also go ahead and throw in here that this is the only image that I have posted that had any sort of post production work besides some minor cropping. All images are SOOC (straight out of camera) All that I did to this image was composite them together and add curves to blend the backgrounds.

We did some action shots with Nathalia and the best advice that I can give you for this is be prepared, shoot a little wider than necessary, and communicate with your model. I gave her a finger count down from 2 and then snapped the picture at zero.

This set up was pretty cool. There was a strobe was back down the hallway behind some plastic door flaps gelled read and a light gelled green coming in from a hallway to the left. Above Nathalia there is a large Octa and there is a gold reflector on the floor with a speedlight bounced off of it for fill. Almost every model set up, everyone in the class got a chance to shoot. You would each shoot between 3-6 frames so you had to be on your game with your timing, but once it was set up if you knew how to work your camera and could follow instructions (Joe would tell you what ISO, f-stop and shutter speed combination to use for each set up) it was pretty impossible to take bad pictures. One thing I also liked to see is that Joe doesn't just walk in there and nail it first time every time. It takes some experimenting for him to get it right too.


These two I really liked and were shot natural light next to a big bank of dirty windows. The top image was +1 EV and the second was as metered by the camera. No fill flash used in either case.
That's pretty much it. I had a great time and I feel it was totally worth it. Joe was great. He learned everyone's names - and used them - which I really appreciated. One thing that he emphasized was to learn the models names and communicate with them. They may do this for a living but they are still normal people and talking with them a bit about what you are doing or just chit chatting between frames helps them be relaxed and get you what you want. He also made a point of telling us that he is always sure to have a mixed group when working with models (men and women) and always asks before approaching or touching the models.
I'd be happy to field any questions if you guys have any. Have a good Wednesday!
Here is the link to a really good article at DPS on shooting fireworks. It says pretty much everything that I would have said. I was a little unmotivated about the whole 4th of July thing this year since all of my friends are busy and it looks like I will be spending it solo (I know, my coolness oozes) but the article got me a little bit excited. Last year I did a lot of close up shots of the fireworks so this year I am going to try to scope out the area early and get more of a landscape feel with some context. Let you know how it goes.
On to the workshop!
We started out the day watching a brief (very) slideshow of Joe's work and introducing ourselves to the group. We them went right into observing Joe set up a small flash set up with Andrew (one of Joe's tech helpers) as the model. I don't have any pictures of that set up because at that point I was still being a little shy with the picture taking but you can see it at Joe's blog under the post "They're Back" (it's the first image).
Next, we moved on to working with the models. One of the things that was nice about working with models that I don't get a lot of normally is that an experienced model, like Jasmine (above) knows what poses make her look good so you don't have to do a lot of work in that regard. It is fun to have the pressure of posing taken off of you and if you are shooting some images purely for portfolio I recommend getting a professional model - as opposed to your bosses daughter - for exactly that reason. It lets you really focus on the set up and the timing it takes to get a good picture with the right expression, eyes open, etc.
One of the first things that I really noticed about the lighting set-ups was how close the light modifiers were to the models. In a shot like the one above of Nathalia there would be a gold reflector at bust level and a diffuser panel overhead literally centimeters out of frame for a close shot like this. Why? Because the closer your modifier is to the subject the more spread you get from the light coming through it which makes the light softer and gives it more wrap.
I know in theory that reflectors are a great tool, especially for fill, but I almost never use them because of the hassle of getting them positioned when working by yourself. Then I discovered the magic technique of throwing it down on the ground and bouncing a flash off of it to create fill. How much difference does it really make? Depends on the lighting situation, but in some cases pretty big. Here's the thing to remember - you are not trying to bounce the flash off of the reflector and angle it towards your subject. Just point it straight down at the reflector a few inches above it and go to town.
This shot is a very high key shot that you might think required a lot of flash power. It was actually shot available light only at a super high ISO 6400. I dialed up my exposure compensation to overexpose between one and two stops and the high ISO gave me a fast enough shutter speed to handhold and still get results like this. If you were to really blow it up there is a bit of noise in her skin tones but really pretty tolerable because of the high key nature of the image.
The whole workshop was set in studio type settings while I was there (though they did branch out and do some other stuff on subsequent days which really makes you want to be there everyday) but I still wanted to get some lifestyle type images. Lauren (above) is not a professional model, but she did a fabulous job. I will also go ahead and throw in here that this is the only image that I have posted that had any sort of post production work besides some minor cropping. All images are SOOC (straight out of camera) All that I did to this image was composite them together and add curves to blend the backgrounds.
We did some action shots with Nathalia and the best advice that I can give you for this is be prepared, shoot a little wider than necessary, and communicate with your model. I gave her a finger count down from 2 and then snapped the picture at zero.
This set up was pretty cool. There was a strobe was back down the hallway behind some plastic door flaps gelled read and a light gelled green coming in from a hallway to the left. Above Nathalia there is a large Octa and there is a gold reflector on the floor with a speedlight bounced off of it for fill. Almost every model set up, everyone in the class got a chance to shoot. You would each shoot between 3-6 frames so you had to be on your game with your timing, but once it was set up if you knew how to work your camera and could follow instructions (Joe would tell you what ISO, f-stop and shutter speed combination to use for each set up) it was pretty impossible to take bad pictures. One thing I also liked to see is that Joe doesn't just walk in there and nail it first time every time. It takes some experimenting for him to get it right too.
These two I really liked and were shot natural light next to a big bank of dirty windows. The top image was +1 EV and the second was as metered by the camera. No fill flash used in either case.
That's pretty much it. I had a great time and I feel it was totally worth it. Joe was great. He learned everyone's names - and used them - which I really appreciated. One thing that he emphasized was to learn the models names and communicate with them. They may do this for a living but they are still normal people and talking with them a bit about what you are doing or just chit chatting between frames helps them be relaxed and get you what you want. He also made a point of telling us that he is always sure to have a mixed group when working with models (men and women) and always asks before approaching or touching the models.
I'd be happy to field any questions if you guys have any. Have a good Wednesday!
Subscribe to:
Posts (Atom)